
How to install a sink with drainer step by step
You can install a sink with drainer yourself if you have the right tools and a properly prepared kitchen worktop. The work involves marking the installation position, cutting the opening, protecting its edges and securing the sink. You then need to connect the kitchen mixer, drain and siphon and check the system for leaks. Learn how to complete each stage to avoid leaks, worktop damage and problems during everyday kitchen use.
How should you prepare to install a sink with drainer?
Before starting, check the dimensions of the sink, the cabinet construction and the fixing method specified by the manufacturer. The drainer position requires particular attention because it takes up additional worktop space and may affect the arrangement of other kitchen fittings.
Prepare the work area as well. Remove items from the cabinet beneath the sink, ensure access to the water and waste connections and shut off the water supply before beginning any plumbing work.
What tools and materials will you need?
To install an inset sink in a wood-based worktop, prepare:
- A tape measure, pencil and square – for taking measurements and marking the installation position.
- A jigsaw with a suitable blade – for cutting the opening in the worktop.
- A drill – for making the starter hole for the jigsaw blade.
- A screwdriver or electric screwdriver – for securing the mounting clips.
- Plumbing spanners – for connecting the kitchen mixer and plumbing components.
- Sanitary silicone or a suitable sealant – for protecting areas exposed to moisture, in accordance with the manufacturers' instructions.
- Installation accessories – clips, screws, seals, drain and siphon suitable for the particular sink.
Protective gloves, safety glasses, sandpaper and a soft cloth for removing dirt will also be useful. Before starting, check that the set is complete and read the sink installation instructions. Stone worktops and worktops made from other hard materials require specialist tools and the correct machining method.
How do you check the sink dimensions and fit in the worktop?
Check the external dimensions of the sink and the cut-out dimensions specified by the manufacturer. These measurements are not the same. With inset models, the sink rim rests on the worktop surface, so the prepared opening is smaller than the complete sink.
Next, measure the width of the sink cabinet. It must accommodate the bowl, drain and siphon, while the cabinet construction must not obstruct the fixing brackets. Also check that there is enough space beneath the worktop for the kitchen mixer hoses and the waste connection.
Pay attention to the worktop thickness and the required distances between the opening and its edges. Leaving too narrow a strip of material by the wall or at the front of the cabinet can make installation difficult and weaken the construction.
How do you mark the position of the sink and drainer?
Before beginning installation, read the installation instructions for the particular sink model. They contain detailed information on correctly marking the installation position and preparing the worktop opening.
Before tracing the cutting line, decide on which side the surface for wet dishes should be located. Not every sink with drainer can be installed in both orientations, so check whether the model is reversible.
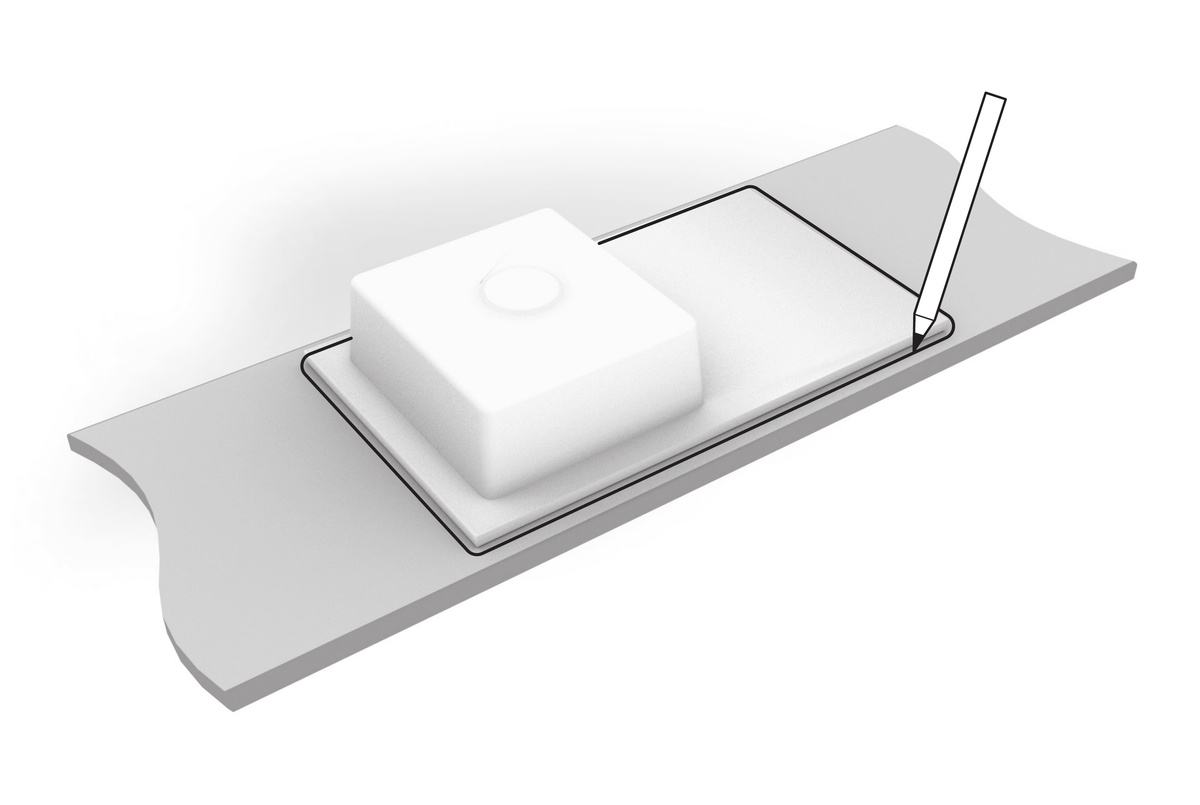
Also consider the position of the kitchen mixer, the distance from the wall and access to sockets and other fitted elements. If the mixer is close to a window, make sure that its spout will not obstruct the opening sash.
Before cutting the opening in the worktop, carefully read the installation guidelines for the specific sink model in the instructions available on the manufacturer's website. Prepare the opening according to the stated dimensions and recommendations. Do not mark the cutting line solely from the external dimensions of the sink.
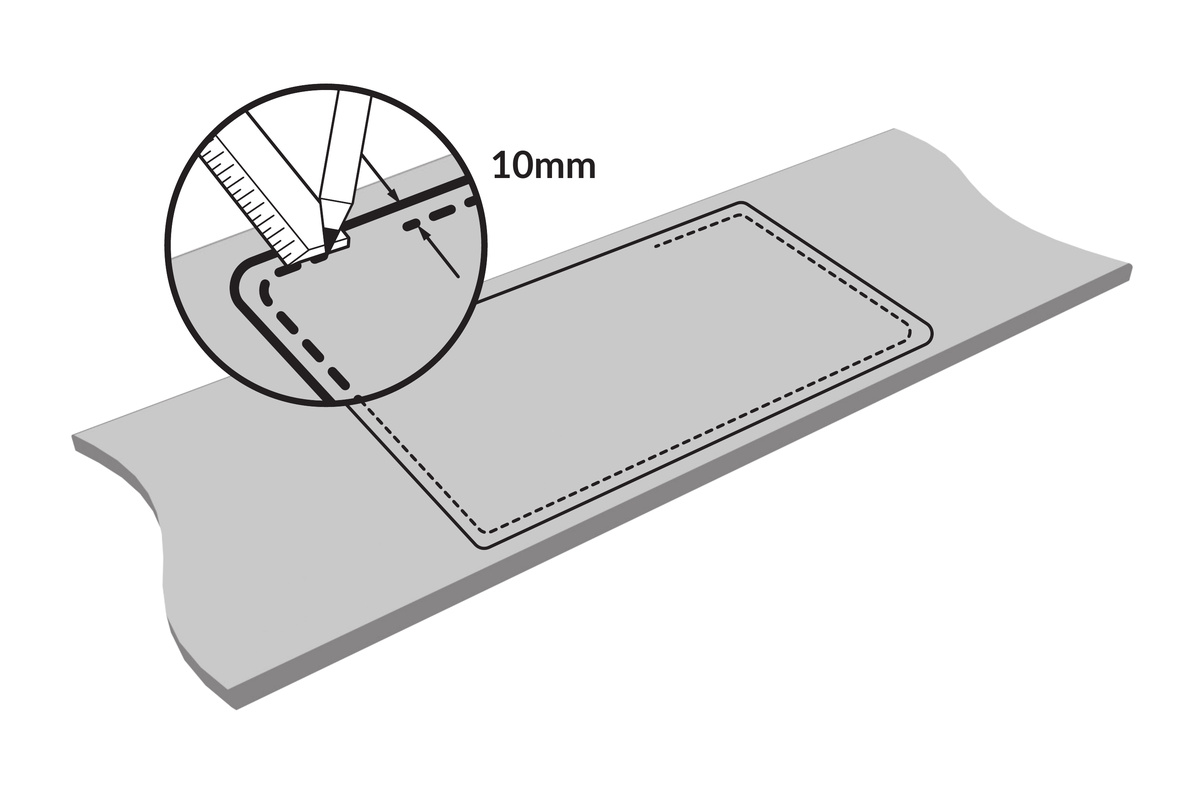
How do you install a sink with drainer in a worktop?
Installing a sink with drainer in a worktop involves three basic operations: cutting the opening, protecting its edges against moisture and correctly fixing the sink. The method described applies mainly to inset models installed in wood-based worktops.
Before cutting, check the cabinet position, the routing of the services and the opening dimensions once again. After removing material from the worktop, it may be impossible to correct an incorrectly selected position without replacing the entire work surface.
Step 1 Cutting the opening in the worktop
Cut the sink opening precisely along the installation line marked according to the installation instructions. For a typical laminate worktop, use a jigsaw fitted with a blade designed for the material being cut.
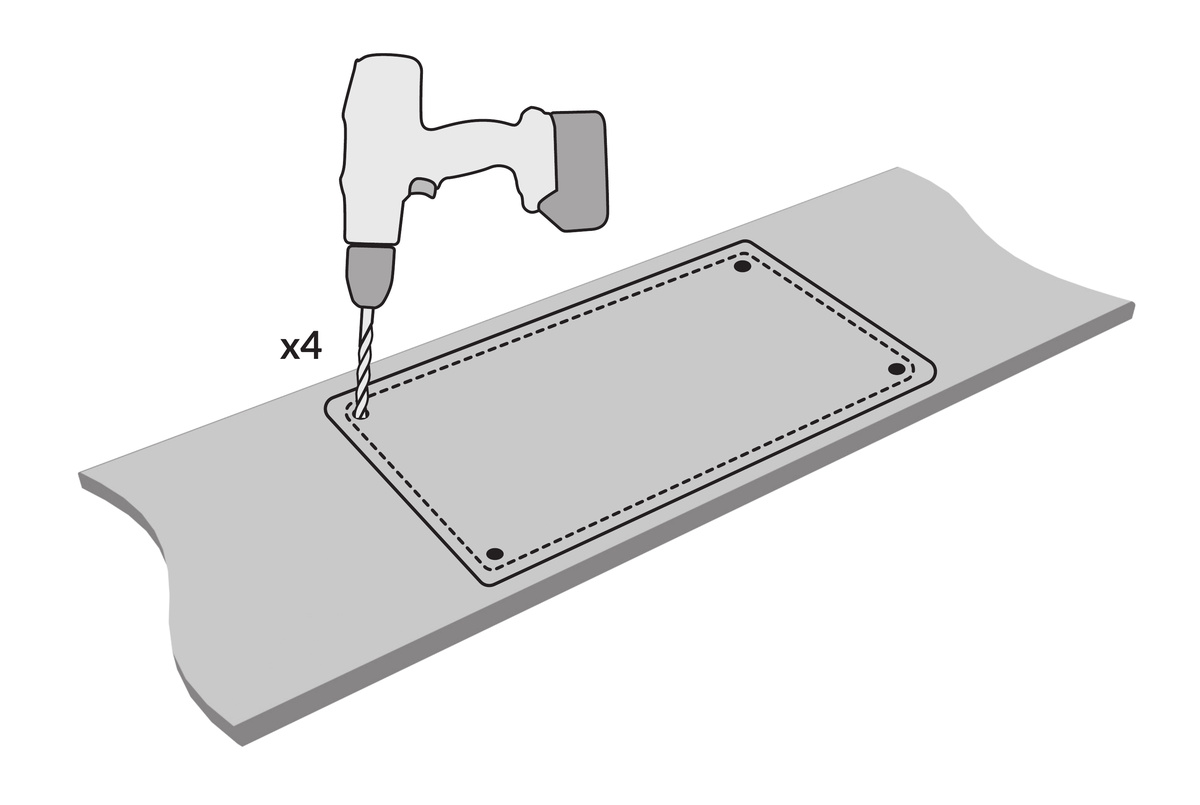
First, drill a starter hole on the inside of the marked line. It should be large enough to insert the jigsaw blade freely. Then begin cutting, guiding the tool slowly and without excessive pressure.
While working, support the section being cut out so that it does not fall unexpectedly. This reduces the risk of tearing the material at the final part of the cut. On laminate surfaces, a suitable blade and protective tape may help reduce chipping.
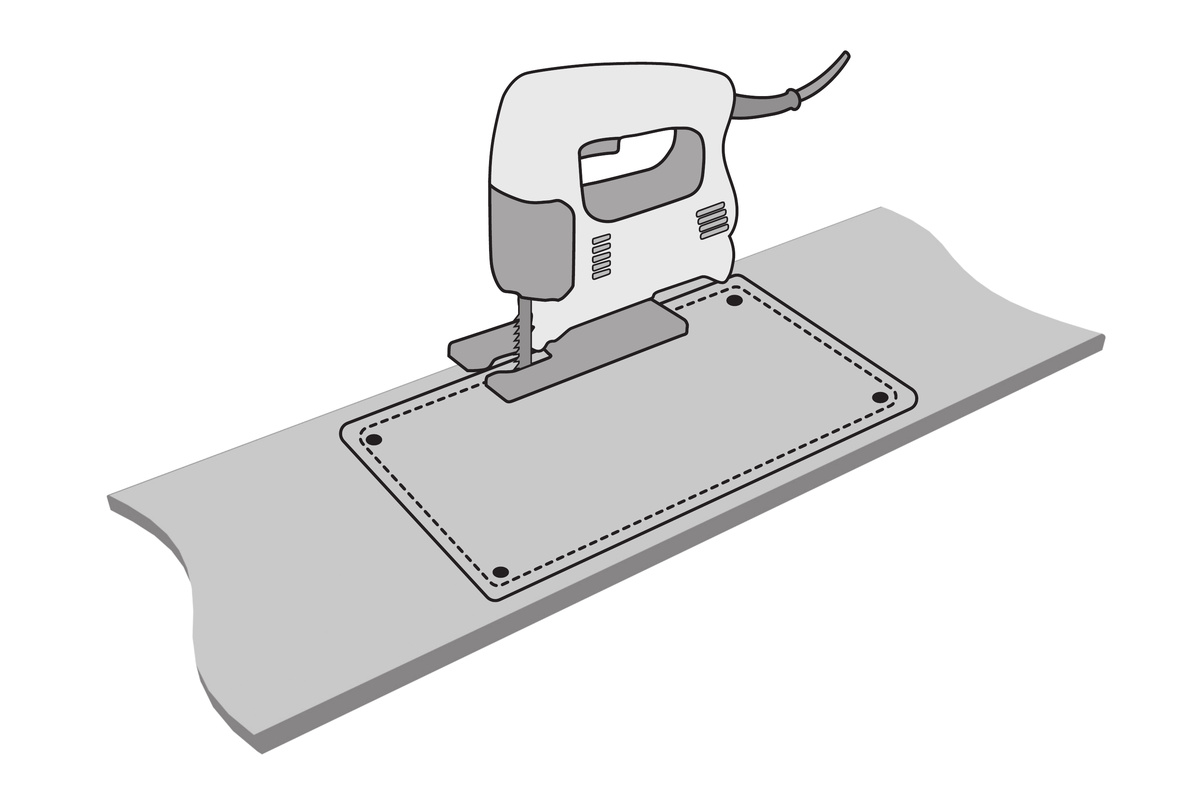
After cutting the opening, remove the dust and check whether the sink fits in the prepared space. Test-fit the sink without securing it permanently to ensure that its rim rests correctly on the worktop and that the clips do not interfere with the cabinet construction.
Step 2 Protecting and sealing the edges
Protect the exposed edges of a wood-based worktop against moisture before positioning the sink. Unprotected board can absorb water, which may eventually cause swelling, distortion and damage to the work surface.
Remove dust left by cutting and make sure that the edge of the opening is dry. Then apply a protective product approved by the worktop manufacturer, such as a suitable sealant or silicone intended for the material. Spread it evenly over the entire exposed surface and observe the curing time stated on the packaging.
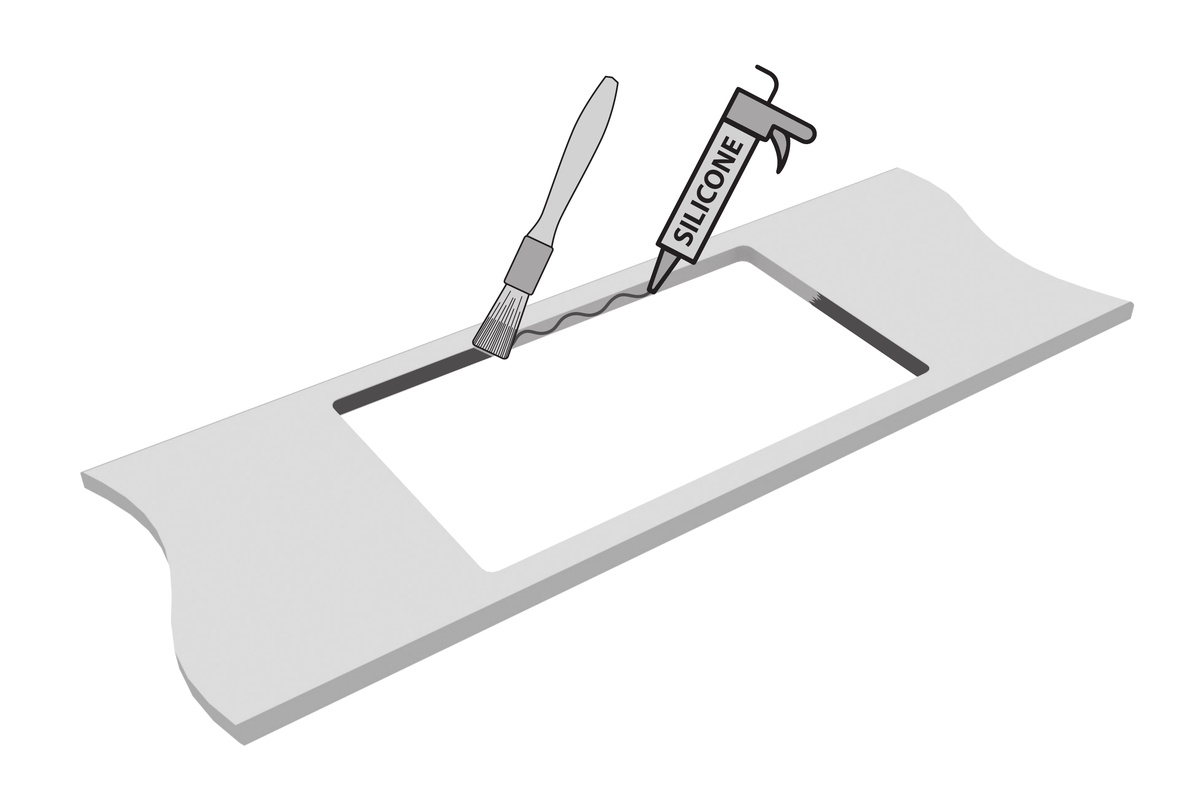
The connection between the sink rim and the worktop requires separate attention. Some models have a factory-fitted seal, while others require additional sealing in accordance with the installation instructions.
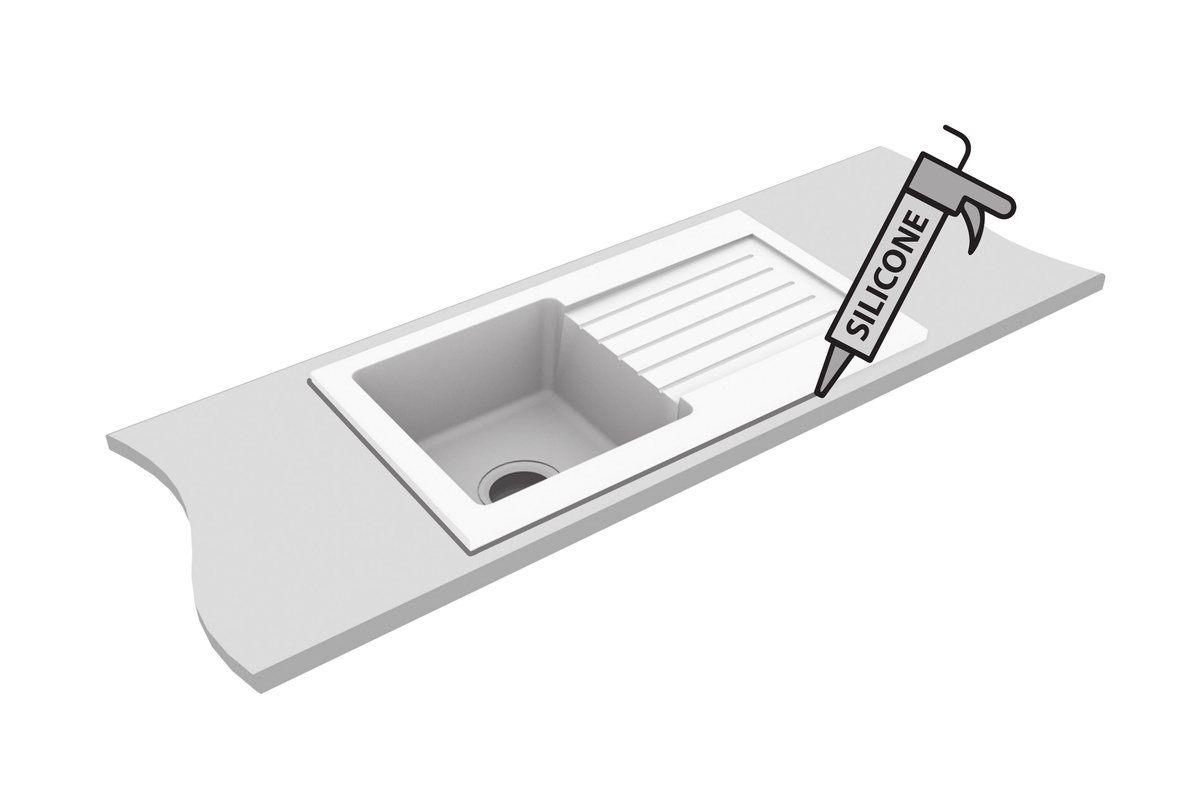
Do not automatically apply silicone to every contact surface. Follow the sealing method specified by the manufacturer. A correctly completed joint limits the penetration of water beneath the sink rim, including around the drainer.
Step 3 Positioning and securing the sink
The sink should sit evenly against the worktop and be secured using the components specified by the manufacturer. Before positioning it, check that the seals are in the correct places and that no dirt remains beneath the rim.
Carefully lower the bowl into the prepared opening and check the alignment of the entire sink. The drainer should rest securely on the worktop surface without visible gaps or skewing.
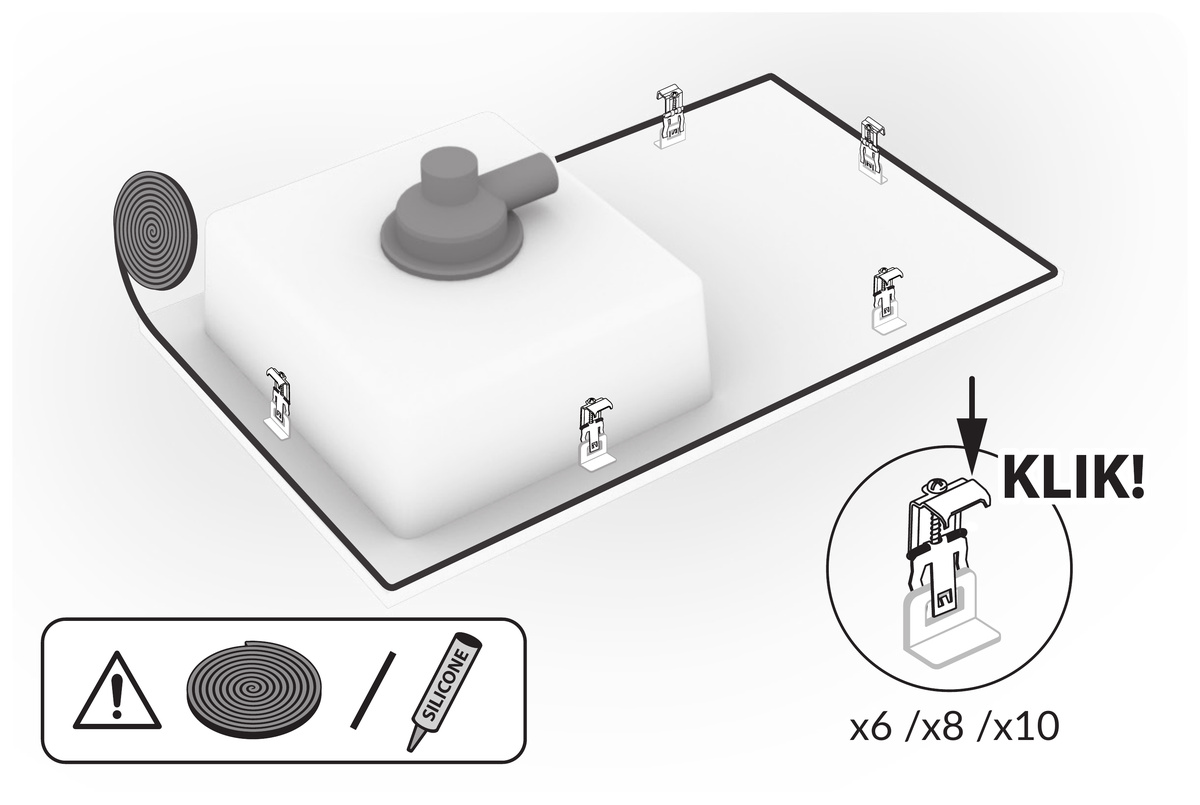
Next, fit the mounting clips beneath the sink rim according to the instructions. Tighten them gradually, alternating between opposite sides. This produces even pressure without placing unnecessary stress on the construction.
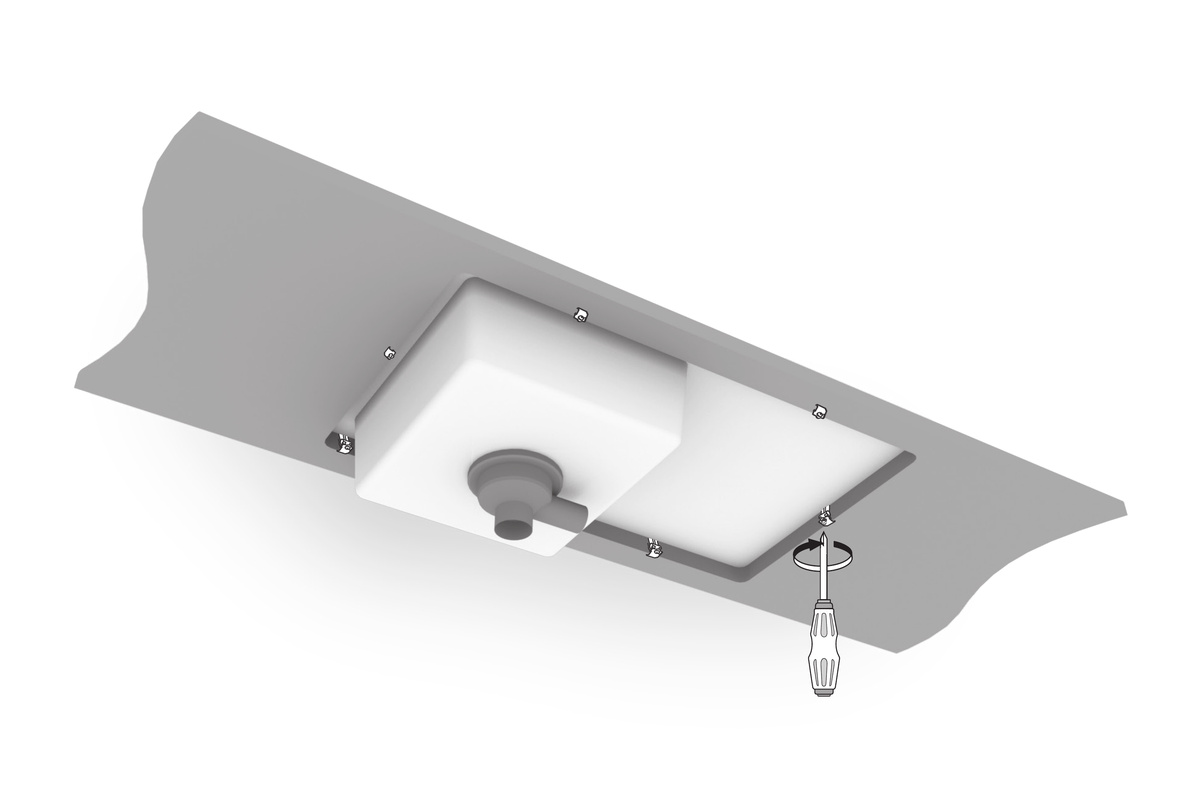
Do not use excessive force. Overtightening the fixings may damage the mounting components, distort thin steel or create stress in the sink material.
If installation silicone has been used, remove the excess before it cures. When the work is complete, check that the sink is stable and that no part of the rim lifts away from the worktop.
How do you connect the siphon and kitchen mixer to the sink?
After securing the sink, connect the drain to the waste pipe and the kitchen mixer to the water supply. The order of these operations can be adapted to the sink construction. If access to the fixings is restricted, it may be easier to install the mixer or some drain components before placing the bowl in the worktop.
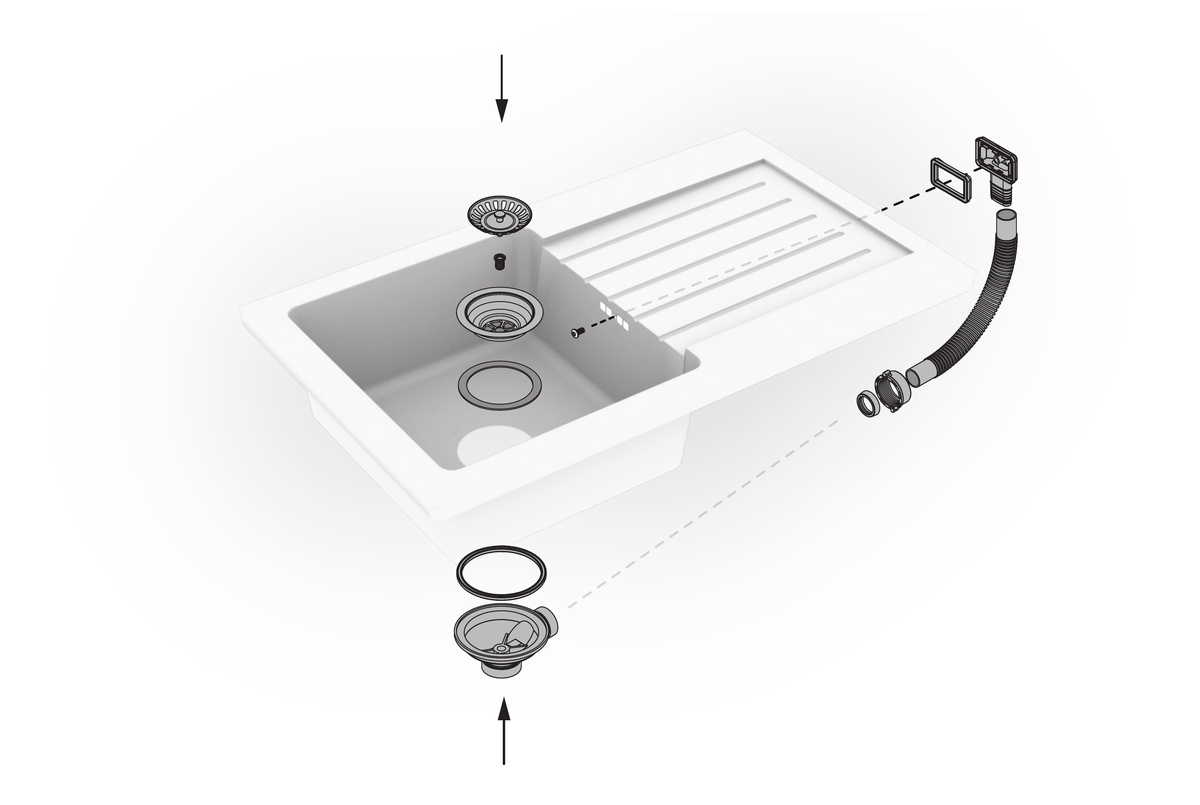
Make all connections in accordance with the instructions supplied with the kitchen mixer and siphon. Before connecting the hoses, make sure that the water supply valves remain closed.
Installing the drain and siphon
The siphon must be suitable for the sink construction and correctly connected to the waste outlet. Its purpose is to carry away used water and retain a small amount of water that forms a barrier against unpleasant smells from the drainage system.
Begin by fitting the drain in the bowl opening. Position the seals in the correct order and connect the components according to the instructions. If the sink has an overflow, an additional opening that prevents water spilling over, connect the overflow pipe as well.
Then install the siphon and connect it to the waste pipe. Check the arrangement of the pipes and seals, ensuring that all joints are seated correctly.
Tighten plastic nuts carefully. Excessive force may damage the thread or distort a seal. Connections fitted with seals do not automatically require additional sealing with PTFE tape.
After assembling the siphon, make sure that none of its components interferes with drawers, shelves or other parts of the fitted furniture.
Installing the kitchen mixer and connecting the water supply
A kitchen mixer is installed in an opening prepared in the sink or directly in the worktop, depending on the product construction. Before tightening the mixer, check the position of the seals and fixing components responsible for stabilising the body.
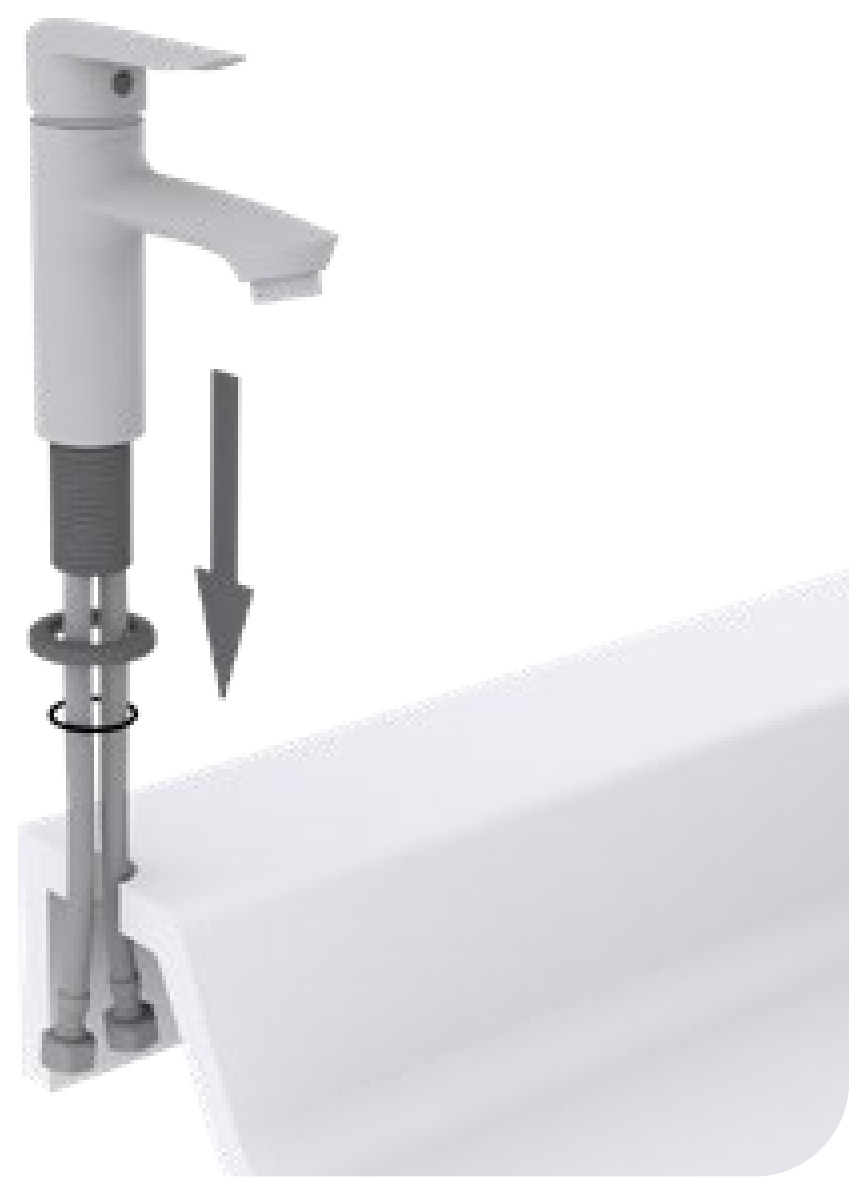
Feed the connection hoses through the mounting hole, position the mixer correctly and secure it from below. Tighten the fixing sufficiently to prevent the body from moving when the spout is turned, but do not use excessive force.
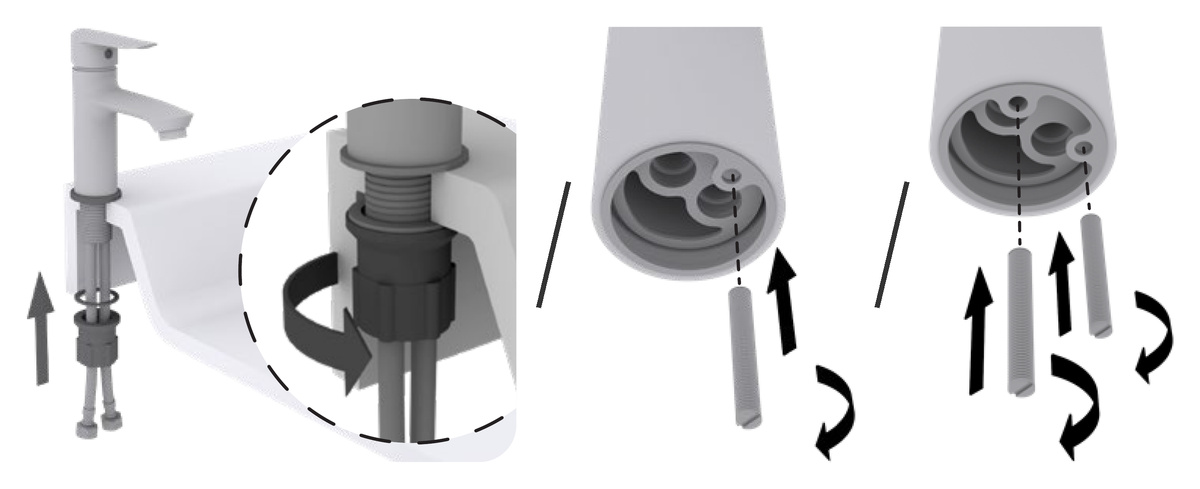
Then connect the hoses to the hot and cold water supply valves. Make sure that the hoses are not twisted, sharply bent or under tension.
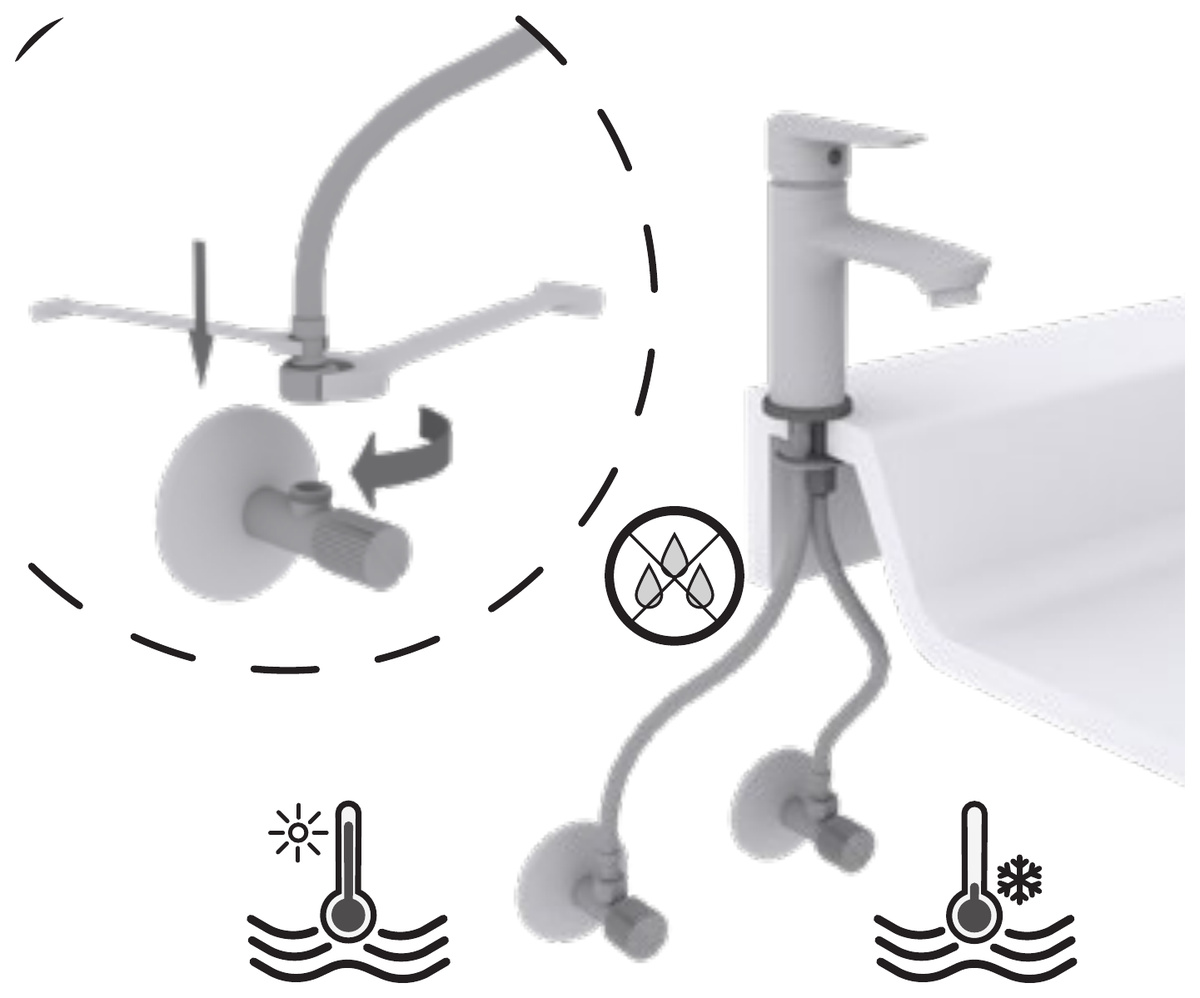
If the kitchen mixer has a pull-out spout, check that its hose can move freely beneath the sink. It should not catch on the siphon, connections or cabinet fittings.
After completing the installation, make sure that all connections are correctly tightened and ready for the system to be turned on.
Checking the connections for leaks
Check the sink for leaks both while water is flowing in and while it is draining away. Simply turning on the kitchen mixer is not sufficient to assess whether the siphon and drain have been installed correctly.
First, slowly open the water supply valves. Check the hose connections at the mixer and angle valves for any moisture. Then run the cold and hot water while checking that the mixer operates correctly.
Next, check the drain. Partially fill the sink bowl, then release the water while observing the siphon and waste pipe connections. If the sink has an overflow, test it for leaks as well.
Place a dry paper towel beneath the connections to make even a minor leak easier to detect. If drops appear, close the relevant supply or stop draining the water, locate the leak and correct the connection.
After the test, wipe all components dry. Check the cabinet again after the sink has been used for a while, as minor leaks are not always immediately visible.
What should you watch out for when installing a sink with drainer?
Measurement errors, incorrect sealing and improper tightening of the fixing components cause most problems during DIY installation. The sink material must also be considered because steel and granite models differ in weight and in the preparation required for installation.
Care at every stage reduces the risk of having to remove the sink, repair the plumbing or replace a damaged worktop.
The most common installation mistakes
One of the most common installation errors is cutting an opening that is too large, which can prevent the sink from being seated and secured correctly. To avoid this, check the installation dimensions carefully before starting and follow the installation instructions for the particular model available on the manufacturer's website.
Another frequently overlooked step is protecting the exposed board against moisture. Even a small amount of water penetrating beneath the sink can eventually damage a laminate worktop.
Incorrect sink fixing is another problem. Uneven pressure from the clips can leave gaps beneath the rim, while overtightening may damage the fixings or the sink itself.
Mistakes can also occur when connecting the siphon. An incorrectly positioned seal, a loose nut or a pipe under tension may cause leaks. Before storing accessories in the cabinet, check every joint and make sure that the installation remains dry.
Does installing a granite sink differ from installing a steel sink?
Installing granite and steel sinks follows a similar process, but the properties of both materials must be considered. In both cases, an appropriate opening must be prepared, the worktop protected, the bowl positioned and the sink secured according to the manufacturer's instructions.
Granite sinks made from mineral composite are generally heavier than stainless steel models. Before installation, check that the cabinet and worktop provide sufficient support. A second person may be helpful when moving and positioning a heavy sink.
Some granite models also require a kitchen mixer opening to be prepared at a factory-marked position. The method depends on the specific construction and must follow the manufacturer's instructions.
Steel sinks are usually lighter and easier to move. When installing them, take particular care to tighten the clips evenly to avoid distorting the rim.
Whether you are installing a steel or granite sink, including a Kuchinox product, check the recommended fixing and sealing method for the selected model. This avoids using unsuitable accessories or solutions that are not designed for the sink construction.
FAQ – frequently asked questions
Can you install a sink with drainer yourself?
Yes, especially when installing an inset sink in a laminate worktop. You need basic tools, accurate measurements and the ability to make plumbing connections. If the worktop is made of stone or the plumbing requires alterations, it is better to use a professional.
Can a sink with drainer be installed in the opposite orientation?
Only if the manufacturer has designed it for reversible installation. Before starting, check the position of the kitchen mixer hole, drain and fixings, as these may determine whether the drainer can be placed on the left or right.
Can a new sink be installed in an old worktop?
Yes, provided that the existing opening has suitable dimensions and allows the new sink to be supported and secured safely. If the opening is too small, it can sometimes be enlarged. An opening that is too large may prevent safe installation.
Is silicone required when installing a sink?
The sealing method depends on the sink construction and the manufacturer's instructions. Some models have a seal beneath the rim, while others require additional silicone. In every case, exposed edges of a wood-based worktop must be protected against moisture.
How do you make a kitchen mixer opening in a granite sink?
In some granite sinks, the manufacturer provides marked positions for making the kitchen mixer opening. The opening method depends on the model construction, so follow the instructions. Do not make the opening in an arbitrary position because this may crack the material.
Can a sink with drainer be installed in a stone worktop?
Yes, if the sink is intended for this installation method and the worktop has been prepared correctly. Cutting an opening in stone, quartz composite or sintered stone requires specialist equipment and experience, so it is best left to the worktop contractor.
What should you do if water appears beneath the sink after installation?
First, identify the source of the leak. If water appears while using the kitchen mixer, check its connections. If it appears when emptying the bowl, inspect the drain and siphon. Moisture gathering beneath the sink rim may be caused by incorrect sealing at the worktop joint.


